Understanding the Lemosho route itinerary is your first step toward a safe climb. This guide is for you, the first-time adventurer. It is a calm, clear map for your mind. We will walk through each day together. We will explain why this route is so successful. We will also answer your quiet questions about gear and safety. You will learn what it feels like to stand on the roof of Africa. Our goal is to replace uncertainty with confidence, one step at a time.
Imagine a path that gives you time. Time to breathe and time to adjust. Time to fall in love with the mountain. That is the Lemosho route. It starts on the quiet, western side. This is away from the busier trails. That gentle start is a true gift. It lets your body adjust to the altitude in peace. The route is longer, typically eight days. This length is its greatest strength. More days mean more time for your body to get used to less oxygen. This is called acclimatization. It is the most important factor for your success and safety. Think of it not as a race, but as a gradual journey. The mountain itself prepares you for the final summit push. For a first-timer, this patient approach builds physical readiness and mental calm.
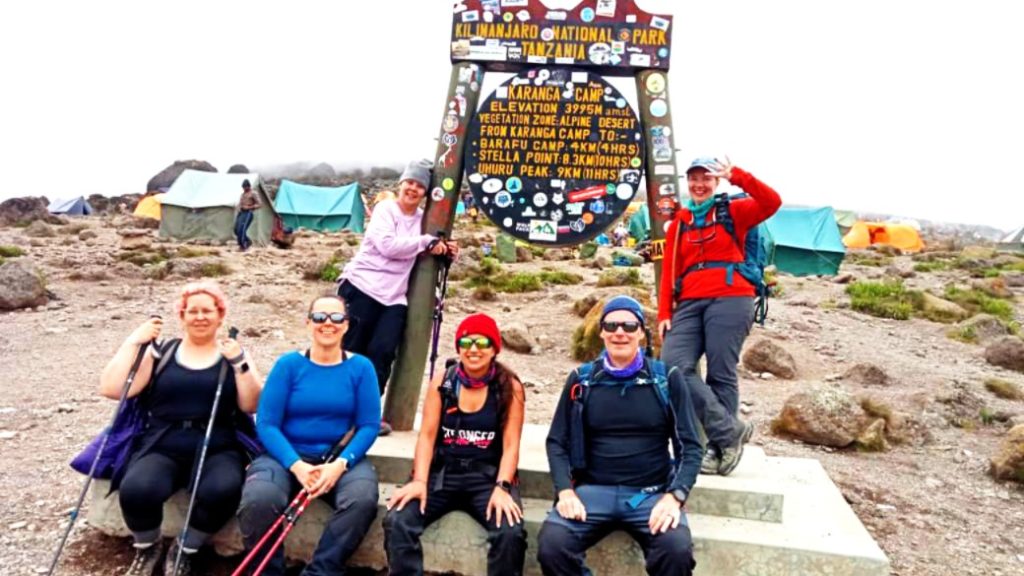
Let’s walk through the classic eight-day journey. Day one begins at the Lemosho Gate. You are deep in a lush, green rainforest. You will hike for a few hours to your first camp. You will hear birds and feel the soft earth underfoot. Day two takes you out of the forest. You reach the vast Shira Plateau. The landscape opens into wide skies and low shrubs. Day three is a key acclimatization day. You walk higher to help your body learn. Then you sleep lower at Shira 2 Camp to let it recover. Day four features the famous “climb high, sleep low” trek. You go to the Lava Tower and then down to Barranco Camp. This camp is nestled beneath the great Barranco Wall. Day five involves a fun scramble up the Barranco Wall. Then you walk to Karanga Camp. Day six is a short hike to Barafu Camp. This is your base for the summit. You rest all afternoon there. Day seven is summit day. You start very early in the dark. You take a slow, steady climb to Uhuru Peak at sunrise. Then you make a long descent back to a lower camp. Day eight is your final descent through the rainforest. You reach the gate and receive your certificate. Then you begin the journey back to town, forever changed.
Success rates tell a story about time and health. The overall average success rate for Kilimanjaro is about 65%. So, about two out of three people who try reach the top. The main reason people turn back is altitude sickness, not fitness. This is where the Lemosho route shines. Its eight-day version has a success rate around 85% or higher. Why? Because of the extra days for acclimatization. Each day you spend slowly gaining altitude teaches your blood to carry oxygen better. It is like gentle, daily training for your body. Choosing the eight-day Lemosho route itinerary is your best decision. It prioritizes your well-being. It also gives you the highest chance of standing on the summit, healthy and strong.
Your gear is your teammate. The mountain has five distinct climate zones. You go from hot rainforest to freezing Arctic summit. You must be ready for all of them. The key is layers. Start with a moisture-wicking base layer. This keeps sweat away from your skin. Add a warm mid-layer, like a fleece jacket. Your outer layer must be high-quality. It needs to be waterproof and windproof. For summit night, you need a heavy, insulated down jacket. Do not forget your extremities. Pack a warm hat, gloves, and thick socks. Also bring a balaclava or neck gaiter. Your feet need sturdy, broken-in hiking boots. A comfortable daypack is essential. You also need a warm sleeping bag rated for below freezing. A headlamp with extra batteries and trekking poles are non-negotiable. A good gear list is long. But each item has a purpose. It protects you and keeps you dry and warm. This lets you focus on the climb.

Safety is the silent priority of every good climb. Reputable operators have clear protocols. Your guide will check your health every morning and evening. They measure your pulse and oxygen levels. This is not an exam. It is a caring check-up. It shows how your body is handling the altitude. You must drink a lot of water. Aim for three to four liters a day. This helps with acclimatization. The mantra “pole pole” (slowly, slowly) is your best friend. It keeps your heart rate steady. Listen to your body. Tell your guide immediately if you have a headache or nausea. A good team has a detailed emergency plan. They have a portable oxygen tank and a stretcher for rapid descent. Your safety is a partnership. It is between you, your body, and your expert guide.

The team that supports you is the heart of the expedition. Porters carry the camp, the food, and the supplies. Their well-being reflects a company’s values. An ethical operator ensures porters have proper gear. This includes waterproof jackets and sturdy boots. They also need warm sleeping bags. Porters should carry fair, regulated weights. They must not have overloads. They are provided with nutritious meals and safe, dry places to sleep. They are also paid a fair wage. As a climber, you can ask questions before you book. Ask about their porter weight limit. Ask what equipment they provide. Also ask how the porters are paid. Choosing a respectful company ensures a positive experience for everyone on the mountain.
Almost all climbs begin and end in Arusha. This bustling town is the gateway to the mountain. You will likely fly into a major international airport first. Then you take a short domestic flight or a drive to Arusha. Plan to arrive at least one full day before your climb starts. This gives you time to rest from travel. You can also meet your guide for a briefing and do a final gear check. Your operator will usually arrange a hotel for this night. After the climb, you will return to Arusha. You often have a celebration dinner and a final hotel night. Then you travel home. Think of Arusha as your basecamp. It is a place to prepare and to process your incredible journey.
How do you choose? The Lemosho, Machame, and Marangu routes are common for beginners. But they are different. The Marangu route is sometimes called the “Coca-Cola” route. It is the shortest and has hut accommodations. But its shorter timeline leads to a much lower success rate. The Machame route is the “Whiskey” route. It is beautiful and popular, usually done in 6-7 days. It is more scenic than Marangu. It also has a better success rate. But it can be busier and steeper. The 8-day Lemosho offers the best acclimatization profile. It has high success rates and scenic variety. It also has less initial crowding. For a first-timer, the extra time on the Lemosho route itinerary is a wise investment.
The mountain has two primary dry seasons. These offer the best conditions for climbing. They are from late December through early March, and from July through September. During these windows, you have the highest chance of clear skies. There is also less rain and stable trails. The December-March period is generally warmer. But it can be busier. The July-September period is cooler. It is also very popular. There are also “shoulder” seasons, like June and October. These can be good but have a slightly higher chance of rain. The long rainy season is April to May. The short rainy season is November. These are not recommended for first-time climbers. Trails can be muddy and slippery. Views are often obscured by clouds. Picking a dry season window increases your comfort and enjoyment.
Expect a simple, powerful rhythm. Your day starts with a warm drink brought to your tent. After breakfast, you hike for several hours at a slow pace. You arrive at the next camp by early afternoon. Lunch is served then. You have time to rest, read, or nap after. Dinner is in a communal dining tent. It is a time to share stories with your group. You will go to sleep early, because days start at dawn. The camps are basic but organized. You have a personal tent. The team sets up a toilet tent for the group. Summit night is different. You wake around midnight. You have a light snack and start hiking in the dark with your headlamp. It is cold and challenging. The air is thin. You walk very, very slowly. Reaching the summit at sunrise is an emotional moment. The descent is long. But the feeling of accomplishment carries you down.
Yes, absolutely. The Lemosho route is a trek, not a technical climb. You do not need ropes or special skills. You need good general fitness and determination. You also need the right preparation. The eight-day itinerary helps beginners acclimatize safely.
The Barranco Wall looks intimidating. But it is a fun, non-technical scramble. You will use your hands for balance in a few sections. But it is not a sheer rock climb. Your guide will show you where to place your hands and feet. Most climbers find it an exciting highlight.
It can be very cold. Temperatures are often between -10 to -20 degrees Celsius. Wind chill makes it feel even colder. This is why your gear list includes a heavy down jacket. You also need thermal layers and warm gloves. Proper equipment makes the cold manageable.
Your guide is trained to recognize the symptoms. The first and best treatment is to descend. If symptoms are mild, they may advise rest and water. For serious symptoms, they will assist you in descending immediately. This is why a longer route with good acclimatization is so important.
Tipping is a customary and important thank you. Guidelines are usually provided by your operator. A typical range is a collective amount from the group. It is then distributed. It is based on the number of days and team size. Discuss this with your guide at the end.
There is no electricity at the camps. You must bring portable power banks or solar chargers. Charge all your devices fully before you start. Then use your power banks sparingly to make them last the entire trek.
You will be surprised by the quality and variety. Cooks prepare hearty, energizing meals. These include soups, pasta, rice, and stews. They also serve fresh fruit. They understand you need carbohydrates for energy. Dietary restrictions can usually be accommodated with advance notice.
Yes, you should train. The best training is hiking on hills with a daypack. If that’s not possible, focus on cardio. Try stair climbing or cycling. Also do leg strength exercises like squats. Building endurance is more important than speed.
You will need to drink 3-4 liters of water every day. Your team provides boiled and filtered water at camp. You carry 2-3 liters in your daypack. Use a hydration bladder or water bottles. Drink regularly, even when you are not thirsty. This is crucial.
Go slowly. “Pole pole” is the secret. Walking slowly conserves your energy. It also helps your body acclimatize. The people who rush are the ones who struggle. Let the mountain set the pace. Listen to your guide. Trust in the slow, steady rhythm of the climb.